LOPRO
DRIVE UP WINDOW SERIES
AIR CURTAINS
|
FREE
FREIGHT |
| FOR
ALL AIR CURTAINS SHIPPED TO LOCATIONS WITHIN THE 48 CONTIGUOUS UNITED STATES |
|
|
|
 |
 |
|
|
|
|
| The
Most Cost-Effective Environmental and Sanitation Barrier You'll Never See |
|
|
|
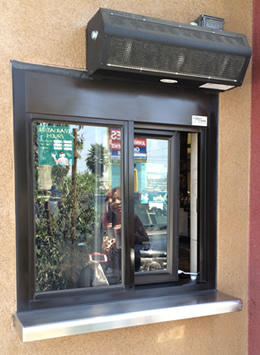
| The
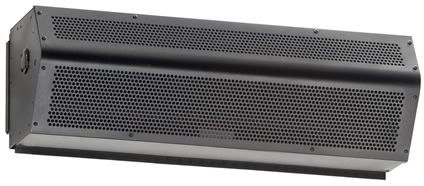
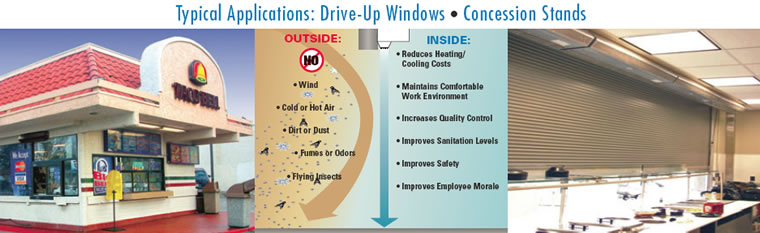
LoPro Drive Up Window Model is designed for use at service window applications.
|
|
|
|
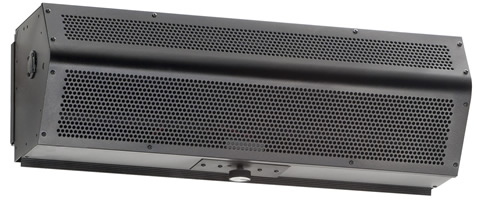
This
compact, space-saving air curtain model creates a reliable air barrier to
insects, dust and fumes without
disturbing customers or employees. Installed easily and economically without
remodeling, the LoPro Drive Up
Window Series provides an unobstructed view while helping to maintain clean,
sanitary conditions. This
combination of special features makes it ideal for fast-food drive-thru
windows and hamburger stands,
drive-thru banks, schools, cleaners and various retail businesses.
|
|
|
|
| AIR
CURTAIN BENEFITS |
|
LOPRO
DRIVE UP WINDOW SERIES FEATURES |
•
Reduces Energy Costs And Consumption
• Creates Effective Environmental Separation
• Maintains Interior Building Temperatures
• Provides Low Operational Costs
• Minimizes Dirt, Dust, And Fumes
• Prevents Flying Insects From Intruding
• Offers An Unobstructed View, Enhancing Safety |
|
• Aesthetically
Pleasing “Low Profile” 8" Design
• Low Noise Level For Quiet Operation
• Easy To Install
• Low Maintenance
• NSF Models Available
(See NSF sheet below for complete specifications.) |
|
|
|
DOOR
HEIGHTS |
|
|
Environmental
Separation up to 8'
Flying Insect Control up to 7' |
| DOOR
WIDTHS |
|
| 25" |
|
|
|
|
|
|
| HEATING
OPTIONS |
|
|
Electric
(Only available for LPV units. LPN units are unheated) |
|
|
|
|
|
|
Model
No. |
Width
of Door |
Door
Height |
FLA
(Ampacity) Single Phase |
Sound
dBA |
Weight
(lbs) |
115V |
208V/230V |
LPV25/LPN25* |
25" |
7'
- 8' |
2.4 |
1.2/1.2 |
49 |
19 |
|
| *
LPN units are ETL Sanitation (NSF/ANSI 37) approved and are fixed speed
only. |
|
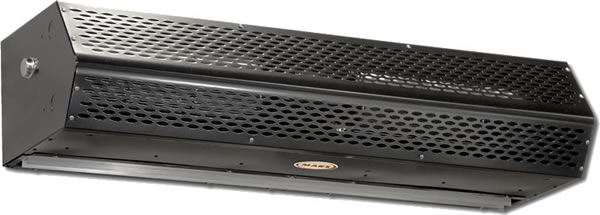
LOPRO
(LPV) VARIABLE SPEED COMMERCIAL UNHEATED MODELS |
|
|
|
|
|
|
Standard
features
1/6 hp direct-drive motor
Variable-speed controller
Sleek metal design
Easy install
5-year warranty
Made in USA |
 |
|
|
Protection
Environmental: 8’
Flying-insects: 7’ |
|
|
|
|
|
|
|
|
|
 |
|
|
|
|
|
|
Standard Color: |
|
|
|
|
 |
|
|
|
|
|
|
|
|
|
 |
|
|
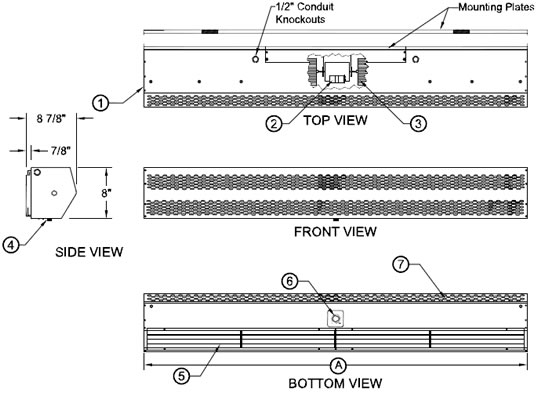
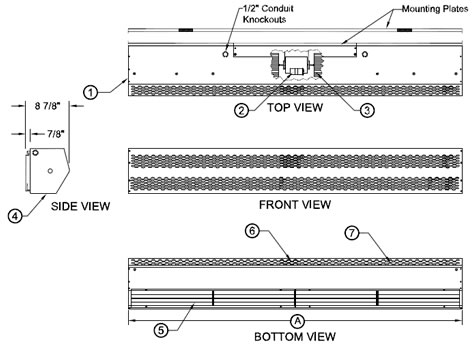
(1)
This product is designed to
meet the National Electric Code
(NEC) and is ETL Listed for the
US and Canada. |
|
(2)
Continuous duty, direct drive,
variable speed, double shaft
motors with automatic thermal
overload protection. Over load
protects motor from burnout,
minimizing maintenance costs.
Motor connected with an 8'
cord, three conductor cord
and plug. |
|
(3)
Blower wheels are rust proof
and dynamically balanced to
provide quiet operation, while
maintaining high air velocity. |
|
(4)
Low profile appearance.
Overall height depth is 8 7/8". |
|
(5)
Air directional vanes, with 40°
sweep front to back,
compensates for drafts. |
|
(6)
Mounted adjustable speed
controller knob allows air
velocity to meet a wide range
of field conditions. Units
greater than 72" are double
units joined with a 2" mounting
bracket located in the center,
field installed. The speed
controller will be located on
the right hand unit and
controls both units. |
|
|
|
|
|
|
 |
(7)
All units have a self contained one piece cabinet, fire
retardant and corrosion proof paint lock
metal, double
protected with Obsidian Black rust preventative
electro-
static powdercoating. |
|
|
|
|
|
|
|
|
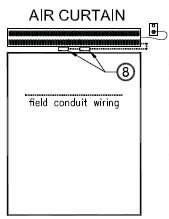
(8)
Normally closed door limit switch(es) is optional and
field installed. Switch to be mounted so
the air curtain
turns on as the door begins to open. |
|
|
|
|
|
|
|
|
|
|
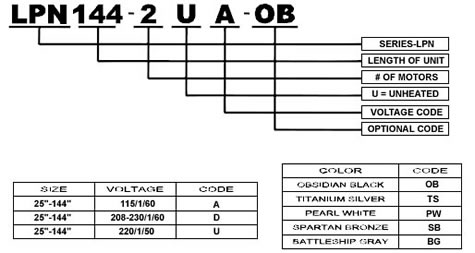
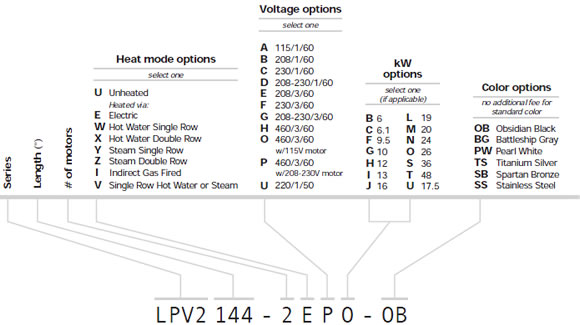
Understanding
Series Order Codes |
 |
|
|
 |
|
Order
Online, by Phone, or by E-Mail |
|
|
|
~ Add
items to your online shopping cart ~
Click the Model No. of the item you wish
to purchase. |
|
|
|
PRICING
FOR LOPRO - UNHEATED |
Model
No. -
Color Code (std) |
Voltage |
Air
Volume (max.) |
Length |
Height |
Depth |
Full-Load
Draw |
Weight
(lbs.) |
Avg
Velocity |
#
of
Motors |
Price |
|
115/1/60 |
625cfm |
25" |
8" |
8
7/8" |
2.4amps |
20 |
1800fpm |
1 |
$903 |
|
208-230/1/60 |
1.2amps |
$903 |
|
| Note:
¹220v runs at 50Hz; all other voltages run at 60Hz |
|
|
|
|
|
|
|
NOTES: |
|
 |
|
1.
This product is designed to meet the
National Electric Code (NEC) and is ETL
Listed for the US and Canada. |
|
|
2.
Continuous duty, direct drive, variable speed,
double shaft motors with automatic thermal
overload protection. Overload protects
motor from burnout, minimizing maintenance
costs. Motor connected with an 8' cord, three
conductor cord and plug. |
|
|
3.
Blower wheels are rust proof and dynamically
balanced to provide quiet operation, while
maintaining high air velocity. |
|
|
4.
Low profile appearance. Overall height is 8"
and overall depth is 8 7/8". |
|
|
5.
Air directional vanes, with 40° sweep front to
back, compensates for drafts. |
|
|
6.
Countertop or concession applications are
denoted with an -F at the end of the model
numbers and supplied with washable
aluminum filters. LPN25, LPN28 & LPN30
include the washable aluminum filters as
standard. |
|
7.
All units have a self contained one piece
cabinet, fire retardant and corrosion proof
point lock metal, double protected with
Obsidian Black rust preventative electrostatic
powder coating . Units greater than 72" are
double units joined with a 2" mounting
bracket located in the center, field installed. |
|
|
|
|
|
|
 |
|
|
|
|
|
8.
Normally closed door limit switch(Es) is
optional and field installed. Switch to be
mounted so the air curtain turns on
as the door begins to open. |
|
|
|
|
|
|
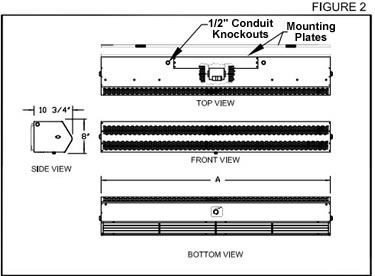
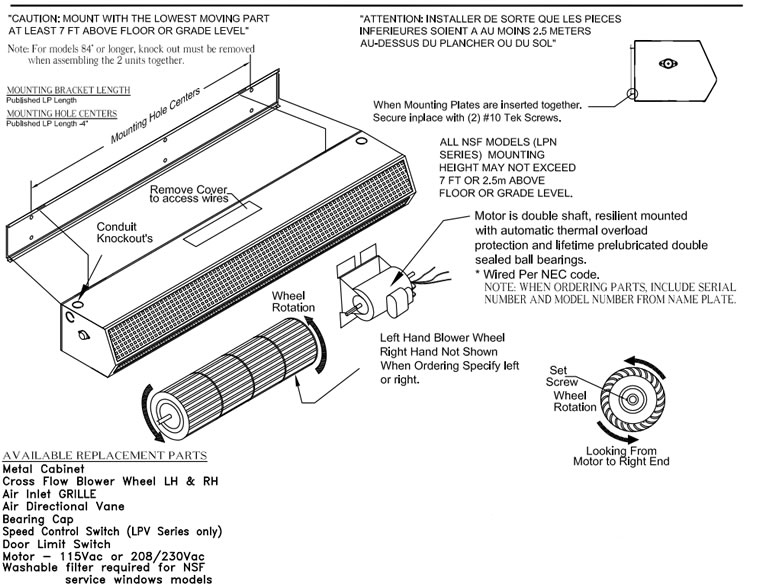
TYPICAL
INSTALLATION |
|
|
|
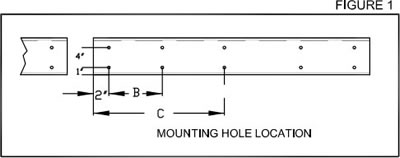
1-
lnstall Mounting plate(s) using the pre-drilled
holes. |
| Model No. |
Unit Length
(A) |
| LPV225/LPN225* |
25" |
|
|
|
|
|
2
- Securely attach cabinet to mounting plate
using tabs as guides, when fully inserted
secure with (2) #10 Tek Screws.
"CAUTION": Unit
to be mounted with
the lowest moving part at least 7 Feet
above floor or grade level. |
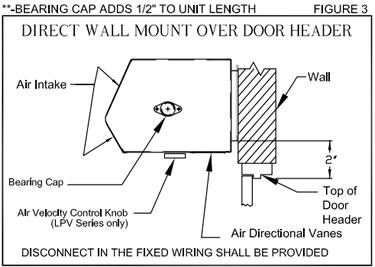
*BEARING
CAP ADDS 1/2" TO UNIT
LENGTH |
|
|
|
|
|
|
|
|
3 - lnstall optional
door limit switch(es) to
door header. (8) |
|
|
|
4
- Plug in unit using the 3-wire cord / plug
supplied. |
|
|
|
|
|
|
|
|
Order
Online, by Phone, or by E-Mail |
|
|
|
~ Add
items to your online shopping cart ~
Click the Model No. of the item you wish
to purchase. |
|
|
|
PRICING
FOR LOPRO NSF ANSI 37 CERTIFIED - UNHEATED |
Model
No. -
Color Code (std) |
Voltage |
Air
Volume (max.) |
Length |
Height |
Depth |
Full-Load
Draw |
Weight
(lbs.) |
Avg.
Velocity |
#
of
Motors |
Price |
|
115/1/60 |
625cfm |
25" |
8" |
8
7/8" |
2.4amps |
20 |
1800fpm |
1 |
$903 |
|
208-230/1/60 |
1.2amps |
$903 |
|
|
 |
|
OB |
|
TS |
|
PW |
|
|
|
|
|
|
|
|
| Optional
Color Available - Std. Production Color is Obsidian Black (matte) See add-on prices below. |
|
|
|
|
|
|
|
Prices
for Colors That are not Standard for the Series
(add these prices to price of Lopro Drive-up
air curtain above) |
| Length of Unit |
25" |
36" |
42" |
48" |
60" |
64" |
72" |
84" |
96" |
108" |
120" |
144" |
| TS |
|
|
|
|
|
|
|
|
|
|
|
|
| PW |
|
|
|
|
|
|
|
|
|
|
|
|
|
|
|
 |
|
Order
Online, by Phone, or by E-Mail |
|
|
|
~ Add
items to your online shopping cart ~
Click the Part No. of the item you wish to
purchase. |
|
|
|
LOPRO
ACCESSORIES - UNHEATED |
| DOOR SWITCHES |
| Automatic
on/off control of air curtain as door is opened and closed |
| LINE VOLTAGE |
| Part # |
Package |
Price |
| 99-014 |
Steel Mechanical Universal Surface-Mounted Plunger/Roller Switch |
$141.50 |
| 24 VOLT CONTROL |
| Part # |
Package |
Price |
| 99-018 |
Commercial Magnetic Reed Switch Only Plastic • Surface-mounted
NOTE: Used with control packages J0023 or J0024 for double
doors |
$66.10 |
| CONTROL PACKAGES - Combination packages of door switches, controllers,
time delays, and thermostats |
| 24 VOLT CONTROL |
| Part # |
Package |
Price |
| J0021 |
Commercial
Magnetic Reed Switch with Controller and Adjustable Time Delay •
115v
6 sec. - 20 min. • Plastic • Surface-mounted |
$385.30 |
| J0022 |
Commercial
Magnetic Reed Switch with Adjustable Time Delay • 208-230v
1 6 sec. - 20
min. • Plastic • Surface-mounted 6 sec. - 20
min. • Plastic • Surface-mounted |
$385.30 |
| J0023 |
Commercial Magnetic Reed Switch with Controller • 115v •
Plastic • Surface-mounted |
$286.20 |
| J0024 |
Commercial Magnetic Reed Switch with Controller • 208-230v 1 • Plastic • Surface-mounted |
$286.20 |
| J0028 |
Door Limit Switch with Controller and Adjustable Time Delay •
115v 6 sec. - 20 min.
• Surface-mounted |
$440.30 |
| J0029 |
Door Limit switch with Controller and Adjustable Time Delay •
208-230v
1 6 sec. - 20
min. • Surface-mounted |
$440.30 |
| MOUNTING BRACKETS |
Part # |
Mounting Bracket |
Price |
|
Transom
Mounting Brackets For glass-frame doors • Set of 2 • Standard
color Obsidian Black |
$165.10 |
|
Tandem
Mounting Kit
Used when multiple units are mounted side-by-side · Standard
color Obsidian Black |
$187.10 |
|
Walk-in
Installation Kit 115v: Includes Magnetic reed switch Controller
and nylon bolt |
$330.30 |
|
Walk-in
Installation Kit 208-230v 1Ø: Includes Magnetic reed switch
controller and nylon bolt |
$330.30 |
| FILTERS |
| Part No. |
Filters |
Price |
| FLTR |
Aluminum Mesh Filter 1/4' Internal-mount • Set of 2 • (size):
Specify size in inches |
$3.10/per in. |
|
|
INSTALLATION
INSTRUCTION FOR UNHEATED LOW PROFILE
(LPV & LPN SERIES) AIR CURTAIN |
READ
INSTRUCTION BEFORE REMOVING FROM CARTON |
|
|
|
| INSTALLATION
INSTRUCTIONS: |
|
PRELIMINARY |
1.
Carefully remove the unit from the box. Loosen the
screws from the intake screen and remove the intake
screen. |
|
|
|
1. Center the
air curtain mounting bracket on solid wall
over doorway. |
|
|
|
2.
Spot holes through 5/16" mounting holes in bracket.
If necessary, drill additional holes in bracket to match
wall stud or any other mounting bars spacing supplied
in the field. |
|
|
2.
Gently remove all packaging materials, hardware and
other accessories from interior of unit prior to
operating. |
|
|
|
3.
Remove the Tek Screws from the wall mounting plate
and remove the mounting plate from the unit. |
|
|
|
3.
Securely fasten mounting bracket with the proper
fastener and set air curtain in key hole slots provided. |
|
|
4.
Install the mounting plate above the opening. The
lowest point of the unit must be at least 1" above
any
obstructions, ie.. doors and/or door closers, etc...
when the unit is installed. |
|
|
|
4. Adjust air
directional vanes approximately 15°
towards the wind load. |
|
|
|
5. Connect to
proper voltage and phase. |
|
|
|
NOTE: LoPro air curtains are not recommended for
heavy insect control. |
|
|
5.
Align the tabs on the rear of the unit with the slots
provided on the wall mounting plate (see drawing
below). The bottom flange on the unit must also
drop in the bottom channel of the wall mounting plate.
Replace the Tek Screws to secure the unit in plate. |
|
|
|
|
ADJUSTMENTS |
|
1.
Pull air directional vanes in air discharge nozzle to
proper position with air flow slanted slightly outward
around 15°. |
NOTE: If the holes provided on the bottom of the unit
and the bottom of the wall mounting plate do not align,
remove the unit and re-install The holes on the bottom
channel of the wall mounted plate must be on the bottom. |
|
|
2.
Set air velocity control louvers so that the air stream
just reaches the floor to prevent turbulent mixing of
inside and outside air. |
|
|
6.
The discharge must be free and clear of any
obstacles for optimum performance. |
|
|
3.
The unit is to be installed such that the airflow is
unobstructed. |
|
|
7.
All wires must be connected internal of the unit and
some knockouts are provided. However, it may be
necessary to create your own knockout, as required. |
|
|
|
NOTE: MODEL NUMBER
DESIGNATES THE
LENGTH OF THE UNIT IN INCHES. |
|
|
|
|
|
| 8.
The unit must be wired per NEC and local codes. |
|
|
|
|
|
|
 |
|
|
|
|
|
 |
|
Model
No. |
Voltage |
Model
Length |
Mounting Hole
Locations |
| A** |
B |
C |
| LPV25* |
115/208/230V |
25" |
- |
12.5" |
| LPV36* |
115/208/230V |
36" |
- |
18" |
| LPV42* |
115/208/230V |
42" |
- |
21" |
| LPV48* |
115/208/230V |
48" |
- |
24" |
| LPV60* |
115/208/230V |
60" |
13 1/4" |
30" |
| LPV72* |
115/208/230V |
72" |
17" |
36" |
Units Length 84" and above, use two Mounting
Brackets with 2" in between |
| LPV84-2* |
115/208/230V |
86" |
- |
21" (2) |
| LPV96-2* |
115/208/230V |
98" |
- |
24" (2) |
| LPV108-2* |
115/208/230V |
110" |
Use LPV48
and 60 brackets |
| LPV120-2* |
115/208/230V |
122" |
13 1/4" (2) |
30" (2) |
| LPV144-2* |
115/208/230V |
146" |
17" (2) |
36" (2) |
|
|
|
 |
|
|
*
- Unit also available for LPN series |
|
|
|
|
|
MAINTENANCE
INSTRUCTION |
|
|
|
|
| ROUTINE
MAINTENANCE |
WARMING
- TO REDUCE THE RISK OF FIRE,
ELECTRICAL SHOCK OR INJURY TO PERSONS,
OBSERVE THE FOLLOWING: |
|
It
is imperative to keep the fans clean, as they eventually
become coated with residue. Dirty fans will lower the
efficiency and eventually throw fans out of balance which
can shorten the life of the blower wheels and cause undue
wear on the bearings. The time between cleanings depend
upon the type and amount of particles floating in the air.
Under normal circumstances, the system will require
cleaning only about once a year. |
|
Use
this unit only in the manner intended by the
manufacturer, if you have any questions, contact the
manufacturer. Before servicing or cleaning the unit,
switch power off at service panel and lock to prevent
power from being switched on accidentally. Servicing
an energized air curtain presents a risk of fire, electric
shock or injury to persons. DO NOT attempt any
maintenance unless the electric supply has been
completely disconnected. Installation work with all
electrical wiring must be done by qualified person(s) in
accordance with all applicable codes and standards.
When cutting or drilling into wall or ceiling, do not
damage electrical wiring and other hidden utilities. |
|
|
|
TO
KEEP THE LoPro AIR CURTAIN LOOKING
NEW, REMOVE SCREWS FROM AIR INTAKE
OPENING AND REMOVE AIR INTAKE GRILLE.
CLEAN ACCUMULATION OF DIRT FROM
MOTOR HOUSING, BLOWER WHEELS &
INTAKE GRILLE THEN REINSTALL INTAKE
GRILLE. |
|
|
|
 |
|
 |
|
Lopro Drive Up Window Air
Curtain, Drive-thru Window Air Curtain, Service Window Air Curtain, Air
Curtain,
Air Curtain Door, Air Curtain Heater, Air Curtains, Air Doors, Door Air
Curtains, Heat Curtains, Mars Air Curtain,
Mars Air Door, Warm Air Curtains, and Insect Barrier from your source
for material handling equipment. |
|